.
I do love flowers and beautiful landscaping though. Which is why DH and I spent all weekend outside planting trees and bushes and flowers in two of our 5 flower beds. Yes, I know that 5 flower beds seems quite excessive for someone who does not enjoy gardening. LOL Trust me these beds will be filled with lots of low maintanence plants. :)
.
Anyway, when I started thinking about what to do for this week's spring assignment for the Emma's Paperie Blog I decided I wanted to do something with gardening. The idea morphed from there, as it does often in my twisted little brain. Hence I created this spice rack using these plastic jars by Making Memories. They come in a great, sturdy box that I used as the holder for the jars. It looked too plain with just the box covered in pattern paper and so I created the fence to put on the box. I wanted to show you how to make this relatively easy and inexpensive fence for your next project.
.

.
You need to start with several popsicle sticks, the straighter the better. As you can see the ones I used for my tutorial are not all that perfect but I used all the good ones already! LOL
.
Start by using an old scissors to cut a point at one end of each of the sticks. Then cut off the rounded end at the bottom.
.
.
.
Sand if necessary and then paint them white.
.
.
.
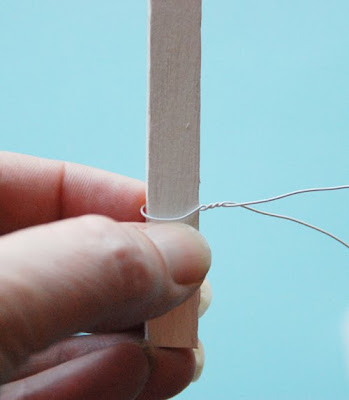
Then wrap thin white wire around the stick and twist as shown.
.
.
.
Do the same with a second wire up the stick just a bit farther. Continue until your fence is the desired length.
.

.
.

.
And that is all that is to it. Easy Peesy as my girls would say. :)
.
.
Here are some close up shots of my project.
.
I created the labels on each of the jars using Microsoft Word. Simply open a new document and choose to insert a shape. Pick the circle icon and draw an oval. You can choose the different type line you would like to create by right clicking on the oval and picking Format Auto Shape from your choices. Insert text in the oval and print it out. I then cut out the oval and matted it on blue cardstock.
.

The complete supply list for this project can be found on the Emma's Paperie Blog. Have a fabulous week and thanks for stopping by!

The complete supply list for this project can be found on the Emma's Paperie Blog. Have a fabulous week and thanks for stopping by!


11 comments:
Absolutely gorgeous...this totally gets me in the spring time spirit!
This makes me so happy, and excited to try one myself!! WOW girl this is FANTASTIC!!!!!
oh that is gorgeous!!!! so clever..just love it
Oh, this is just so pretty!!
Oh wow! This is awesome! Thank you so much for sharing this! :)
flip. that is tooooo cool. tfs!!! i love it. i might could do this. remember i have adventures. lmao...
That project is just so adorable! You did such a neat job of mixing such great products together.
What a cool project! (I feel the same way about gardening. Thankfully, my dh is really into it.)
WOW! What a wondeful idea. FAB project.
Oh that's cute! Makes me want to eat popcicles just for that! (Like I need a reason, ha!)
just too cute!!
Post a Comment